So let’s get started and firstly see what exactly a QR Code is?
What is QR Code?
QR stands for Quick Response. This is basically used for picking up some random data and displaying on any device but, these days it is commonly used for cell phones operations.
Although the QR Code can be very handy, it has certain limitations too. The reason why they are more useful than a standard barcode is that they can store and present much more data digitally, including URL links, geographical coordinates, and text and much more. The other key feature of QR Codes is that instead of requiring a chunky hand-held scanner to scan them, many modern cell phones can scan them. The full Wikipedia description is here.
Implementing QR Code Reader Programmatically
So, create a new Xcode project by choosing a single view application template provided in Xcode and name whatever you like. In the demo demonstrated here, I am naming it QR Reader demo. This tutorial is not much about using the storyboard, we will be programming for achieving the functionality. So, first thing first, heads over to the info.plist and add the key-value pair for the camera-usage description to your app as shown in the figure below. This app requires to access the Iphone’s Camera hardware for scanning the code. Once you have finished then we are good to go for coding. Go to viewController.swift file, here we need to import a library called AVFoundation which stands for the audio-video foundation, that provides a very powerful media functionality to our app. To achieve the scanning functionality in our app, we need to follow certain steps i.e
Make a preview layer Define a camera session make a capture device to display the video in the camera session add the input and the output of that capture device define a queue where the outputs from the session can be processed add metadata objects
Starting the Video representation Session by code
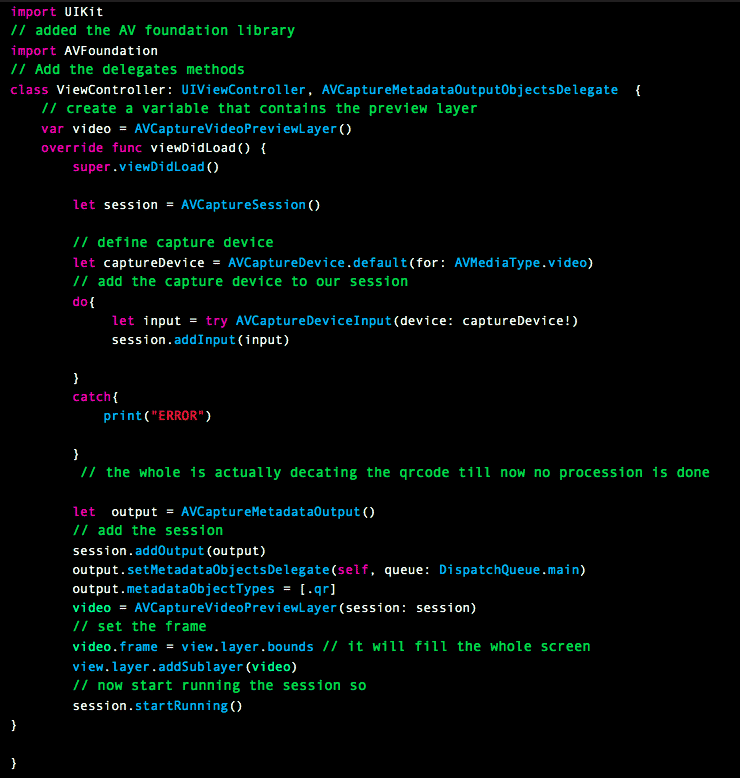
copy the below codes shown in the figure, these codes are only for detecting the QR code. We are not processioning them yet.
firstly, the aim is to display some video to our user for that ‘video’ variable is created that is going to contain the display i.e the video. Now, we can create the session for that video layer in our viewDidLoad method. Define the capture device that will capture all the things that we can display thus the ‘captureDevice’ variable is created. Take the output from the camera i.e the capture device and put it in the session so that we could have something to work with. we have provided the session its input by creating the input constant and now of course from that session, we want to gain some output so that QR code can be recognized. For that, do-catch statements are used which are the exception handling mechanism in Swift. Now, create a queue and process that on the main thread which is the most optimum way of giving us the best possible results for that we have made the metadata object on the main thread and we are only interested in QR type objects. Though you can use face recognition type as well, for now, that is not a matter of concern here. At last, the view is given its frame and added to the main layer to display the video session using a camera and we have started the session using session.startSession() code
Recognizing the QR Code
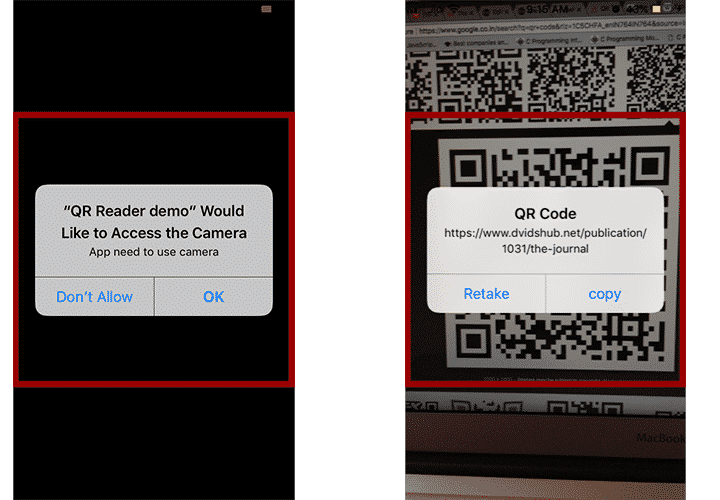
Now since we can record our session using the camera, the next step is to detect the QR code when we point towards them so for that, copy the below codes outside the viewDidLoad method to your sample or commercial project. This function is called whenever we have some output. Now, we want to process that output. Now add some funky style to show the user in a nice way. So, head over to the storyboard and add an image view object as shown in the figure. Here, I have used a square image as a placeholder in the image view. You can download the image from here. Add an outlet of this image view to your code file i.e viewController.swift and name it according to your choice. Here I have named it myQRCodeImageview. If you don’t know how to add an outlet check here. Now, add the below code to your viewDidLoad method just beneath the view.layer.addSublayer(video) line. And that’s it. We are now good to go to test our application. So let’s run the application on your device and check if it is decoding the QR code or not for which we have coded in this article.


